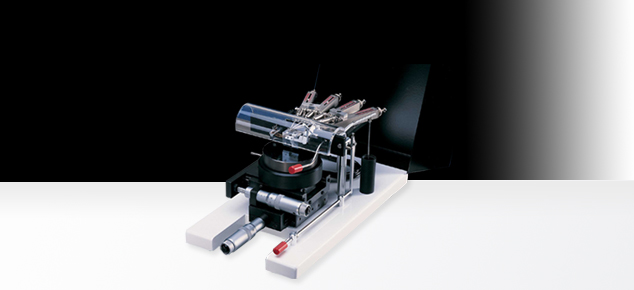
The probe guidance system is kinematic and thus free of all lateral play. The needles are positioned by upper and lower jeweled guides, each needle being constrained by a spring-loaded ruby ball at each guide.
- 4-Point Probe Measurement of wafer sheet resistance
- 4-Point Probe Measurement of epitaxial and diffused layer resistivity (where the layer is of the opposite conductivity type to the substrate, or the substrate is an insulator)
- 3-Point Spreading Resistance Measurement
Principle Features
- Highly repeatable needle contact conditions owing to controlled velocity of descent
- Individually adjustable needle loadings with direct indication of set load
- Kinematic needle guidance system employing precision ruby ball guides and polished tungsten carbide rods
- Solid tungsten carbide needles with precision radiused tips
- Accuracy of needle spacing +/- 0.01mm, no side play
- Needles may be readily replaced without fear of derangement or loss of accuracy
- Fully visible contact area
- Micrometer controlled slice displacement for determination of resistivity gradient or junctions on a beveled slice.
- Hinged steel cover to eliminate effects of light and electrical interference during measurement
General Construction
The probe guidance system is kinematic and thus free of all lateral play. The needles are positioned by upper and lower jeweled guides, each needle being constrained by a spring-loaded ruby ball at each guide. The needles slide through their guides with minimum friction, and exchanging new needles for old or broken ones is a simple, quick operation. Changing needles does not affect the characteristics of the unit – provided that replacement needles are the same diameter – spacing and co-linearity will be retained. Variation in needle diameter do not introduce play.
Velocity Control
This device controls the velocity of the needle descent and the rate of applying load and thus offers uniform contact conditions from one measurement to the next. An air dashpot has been employed, since it’s mechanism is vibration free and has a continuous motion. A spring is applied to the raising and lowering lever, tending to lower the needles. The dashpot is attached to the lever so that the lever is retarded by the piston.
Method of Operation
A cam shaft operated by a small lever projecting through the perspex cover sets the machine for either four probe operation (lever up) or three probe operation (lever down).
i) During four probe operation all four needles rise and fall normally. The velocity control should be set as desired.
ii) During three probe operation for spreading resistance measurements, the tension on the first probe should be reduced to zero and the lever pulled down. This lifts the first probe tension gauge finger so that it is inoperative. the central probe finger is raised slightly so that this probe contacts the specimen last. The velocity control knob should be set to give a probe descent rate of approximately 1mm per second.
The Universal Probe uses four user-replaceable probe tips that are mounted in the Guidance Unit. The Guidance Unit determines the probe tip spacing of either 1.0mm, 1.27mm, or 1.59mm. The individual tips can be user replaced or the entire Guidance Unit (which includes four tips) can be user replaced.
A complete four point probing system consists of the Universal Probe shown above, combined with the RM3000 Test Unit
The Universal Probe is sometimes used to make the three point spreading resistance measurement. Click here for more information.
| SPECIFICATION – PROBE NEEDLES | |
| Material: | 0.5mm diameter tungsten carbide, 26mm long, 45 degree included angle, 25 micron tip radius (or larger up to 100 microns) |
| Spacings: | 1.00mm, 1.27mm, 1.59mm – tolerance +/- 0.01mm |
| Travel: | 4mm |
| Insulation resistance: | 2 x 10⁵ megOhms at 500 volts |
| Load: | 0-100 grams applied by adjustable individual tension gauges |
| Specimen: | Slice only, 76mm diameter is normal maximum |
| Mounting table: | Ball bearing co-ordinate table with 0-25mm x 0.01mm micrometer screws (others available to order) carries a rotary table with 76mm diameter vacuum slice adaptor 14mm high |
| Packed for shipment: | 480mm x 320mm x 320mm high |
| Net weight: | 7 Kg |
| Gross weight: | 9 Kg |
Downloads
| Product brochure for the Universal Probe (222K PDF file) | |
| Instruction manual for the Universal Probe (736K PDF file) | |
| Document on the Jandel Universal Probe Guidance Unit |
Four-Point-Probes is a division of Bridge Technology. To request further information please call Bridge Technology at (480) 219-9007 or send e-mail to Joshua Bridge at: sales@bridgetec.com


